


Digital Cameras offer all sorts of automatic modes. You can set the camera to measure the exposure automatically and not worry about the settings Yourself. If You want to give Your photographic joy to the electronic boxes, then this is fine, but learning how exposure works and what a triangle has to do with it, will help You tremendously. Conquer the Manual Mode again and find the right settings with the support of the exposure triangle.
The exposure triangle sounds like a strange rule of art. In reality, the combination of shutter speed, aperture, and ISO is easier explained and understood than You think.
Don’t be afraid to shoot in manual mode and discover photography from a new side.
After understanding these fundamentals, You will enjoy digital much more and are able to create the photographs that You desire a lot easier.
Automatic Exposure
So far, You might have used the automatic exposure detection of the camera and worked with, what the camera decided to give You.
By pressing the shutter button half-way down, You activate the focus and metering of the digital camera. Depending on the metering mode, the camera sets the aperture, shutter speed and ISO itself.
This can work out well and digital cameras are already so far advanced, that the success rate is really well. But the automatic modes are still limited when it comes to situations where the light isn’t perfect.
Either in the bright sun or when it is darker outside, the automatic exposure, detected by the camera can be very inaccurate. The photograph will be either too dark, or bright, which will result in areas that are either just black or white without showing any details.
To get well-exposed photographs in these situations the exposure triangle is an easy learning tool in getting the “right” amount of light.
Using the manual mode, You not only can expose the photograph better, You can also change the depth of field better to create the popular bokeh more easily.
If You want to be more serious as a Photographer, there is no way around the manual mode and understand the exposure triangle, but don’t be afraid in this guide I will explain how the triangle works very easily. At the end of this article, You can also find a simple overview that You should memorize.
Understanding Exposure in Photography
The Exposure refers to the amount of light that hits the sensor. Maybe it is easier to understand if You imagine You have a film in Your camera, as the sensor doesn’t work very differently when it comes to the exposure.
Basically, the more light the film/sensor hits, the brighter the photograph will be. If You reduce the amount the picture will be darker.
This relation shouldn’t be too complicated to understand.
In photography, the levels of exposure are coined “stops”. Increasing the exposure by 1 Stop means to double the total amount that hits the sensor/film.
This can be done, by varying either one of the three components that affect the exposure: Aperture, Shutter Speed or ISO.
Three Main Components of Exposure
In photography, there are three factors influencing how bright or dark Your photograph will be.
The aperture, that also defines the depth of field
Shutter Speed, which can create blurry images
ISO – creates noise at higher rates
Your duty in the manual mode is it now to balance these three factors to achieve the optimal exposure.
Understanding the relation of these three factors becomes increasingly more important when You want to create certain styles and don’t want to rely on the automatic choice of the camera anymore.
Before describing the Exposure Triangle, I want to explain the influencing factor more in-depth, so that You have a better understanding of the relations in the triangle.
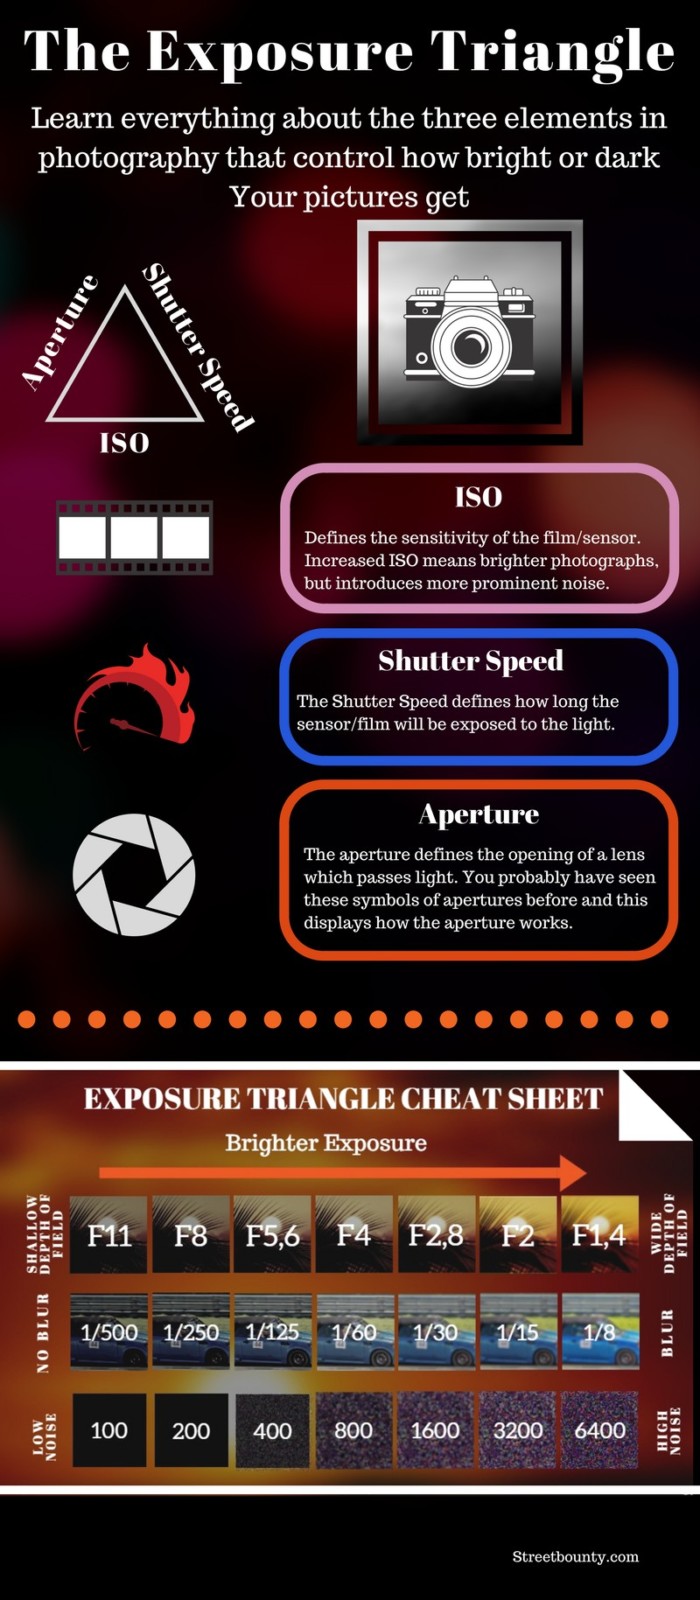
Aperture Definition
The aperture defines the opening of a lens which passes light. You probably have seen these symbols of apertures before and this displays how the aperture works.
In the exposure triangle, the aperture is the most complicated factor, since the amount of light that enters the lens is non-linear with the f-stop.
The “openness” of the lens is referred to as the f-stop which can be factors such as 1.4, 2, 2.8, 4, 5.6, 8, 11.
The lower the f-stop, the more light can enter and the shallower is the depth of field. In this example, at an f-stop of f/1.4, the most amount of light can enter and the depth of field is the narrowest.
At an f-stop of 2, only half of the amount of light can enter the sensor compared to f/1.4.
To explain it more mathematical, the aperture describes a circle function and as such the circle area is π*r^2.
At an aperture of f/1.4, we get a factor of π*(1/1.4)^2 = 1.6
Same with f/2 -> π*(1/2)^2 = 0,785
And for f/2.8 -> π*(1/2.8)^2 = 0,4
As You can see, the area gets divided in half with the f-stop steps presented above. Therefore it is advised to memorize the “full-stops” in photography.
Some lenses also have the f-stops displayed on the lens ring, which can help You in case You don’t remember the exact full-stops anymore.
How “open” the aperture can be, depends also on the lens. Some prime lenses go as high as 1.2 while zoom lenses might start at 3.5. Have a look at the front of the lens, where usually the number is displayed.
Shutter Speed
The shutter speed is easier to understand now as it is a linear function.
If You reduce the shutter speed and go slower more light enters and if the shutter speed gets faster, less light can enter.
In contrast to the f-stops, this can be displayed as simple proportions.
Let’s take 1/200s as the basis.
Then 1/100s will take in double the amount of light and 1/400s will only get half of the light.
Remember that You can also control the “blurriness” of Your pictures, so if You want to go near 1/25s to get some motion blur of moving objects, You will most likely have to adjust the aperture to get a well-exposed photograph.
Example
If the correct amount of exposure would be at 1/200s at an f-stop of f/4 and You reduce the shutter speed to 1/25s You have to set the aperture to f/11 to compensate the 3-stops.
More examples will follow when displaying the exposure triangle
ISO
The third influencing factor is the ISO.
Back in the analog days, the film had a specific sensitivity to light. A film with an ISO of 400 was more sensitive to light than a film with an ISO of 100.
In exchange for the higher sensitivity, the image quality went down, as the noise increased.
Now, we might have digital sensors, but these ISO rules still apply.
A camera set to ISO 200 is double as sensitive as at ISO 100, thus doubling the amount of light.
In contrast to the analog film, where chemicals and materials were responsible for the sensitivity, digital sensors use algorithms to enhance the sensitivity to light.
Depending on the sensor quality and format, the noise can be very noticeable at values of ISO 1.600, while some high-end cameras are still very good at ISO 6.400.
To make it simple and get the best image quality, try to keep Your ISO at 100 and only increase it in case You have reached limitations with the aperture and shutter speed.
The Exposure Triangle Explained
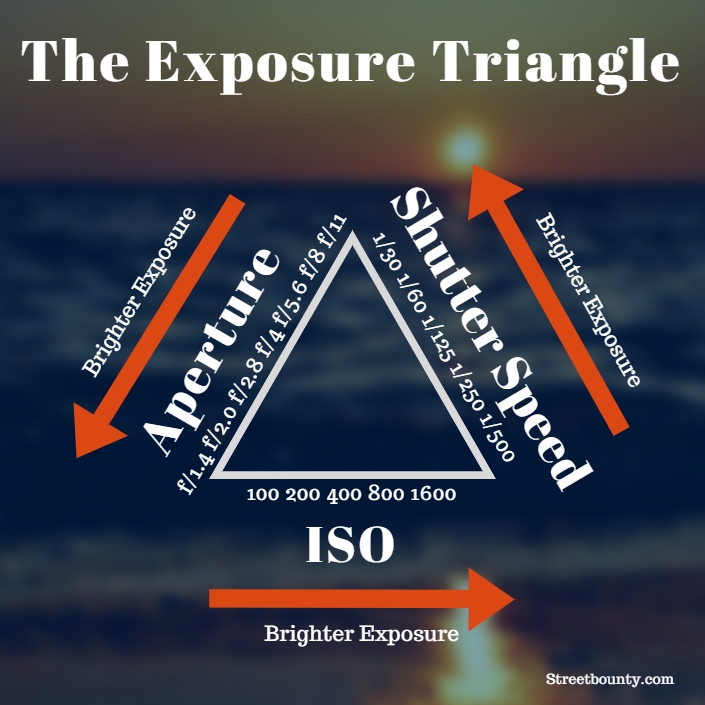
The Exposure Triangle is a simple visualization of the aforementioned influence factors and how they affect each other.
I have explained before, that the aperture is non-linear, while the Shutter Speed and ISO are linear.
The main finding in the exposure triangle is the balancing between the three factors.
Let’s say You are taking a portrait with the following settings
f/4.0 – 1/200s – ISO 100
Now You want a more narrow depth of field to create a better bokeh in the background, so You lower the aperture to f/2.8. You were happy with the exposure before and now at f/2.8, the photograph is too bright. How could You change the other settings balance the exposure to the level how it was before?
Changing the ISO doesn’t do much, You would have to lower the ISO, but the value of 100 is usually the lowest, so You are limited in this department.
So the only thing we could change is the shutter speed.
At f/2.8 the picture is exactly 1 f-stop brighter, which means we need to reduce the shutter speed by one f-stop.
Since the shutter speed is linear, we can reduce the light, by dividing the shutter speed in half.
So to capture the same amount of light the settings would be
f/2.8 – 1/400s – ISO 100
Another example of motion blur
Let’s say You are photographing a race of any sort and want to add some motion blur to the fast moving objects.
So far You were happy to use the following settings.
f/8 – 1/200s – ISO 400
To capture the motion blur, You reduce the shutter speed to 1/25s. How would You need to change the aperture and/or ISO to get the same amount of light?
We could change the aperture. With the shutter speed reduced at 1/25s, we would need an aperture of f/22.
The option would be to adjust the ISO.
With an ISO of 400, we are already reducing the image quality a bit and have an increased amount of noise. Since we are having a slower shutter speed, we have room to go to ISO 100 with gives us the best image quality.
ISO 100 is only 2 stops below, while the shutter speed is a difference of 3 stops.
Which means that we still have to adjust the aperture by one stop.
The right solution in this situation are the following settings when reducing the shutter speed from 1/200s to 1/25s.
f/11 – 1/25s – ISO 100
This gives You the best image quality.
If You shoot with an ISO higher than 100 and You are either reducing the speed or open the aperture, lowering the ISO would be the first priority to give You the best quality.
Exposure Triangle Cheat Sheet
So far we did all the calculations in our head.
Memorizing the f-stops of the aperture should help You to get the exposure right and the linear characteristic makes it also easier for the shutter speed and ISO.
But when You are changing the settings very extremely it can still be difficult to calculate everything in Your mind.
For that, You can use the exposure triangle cheat sheet below.
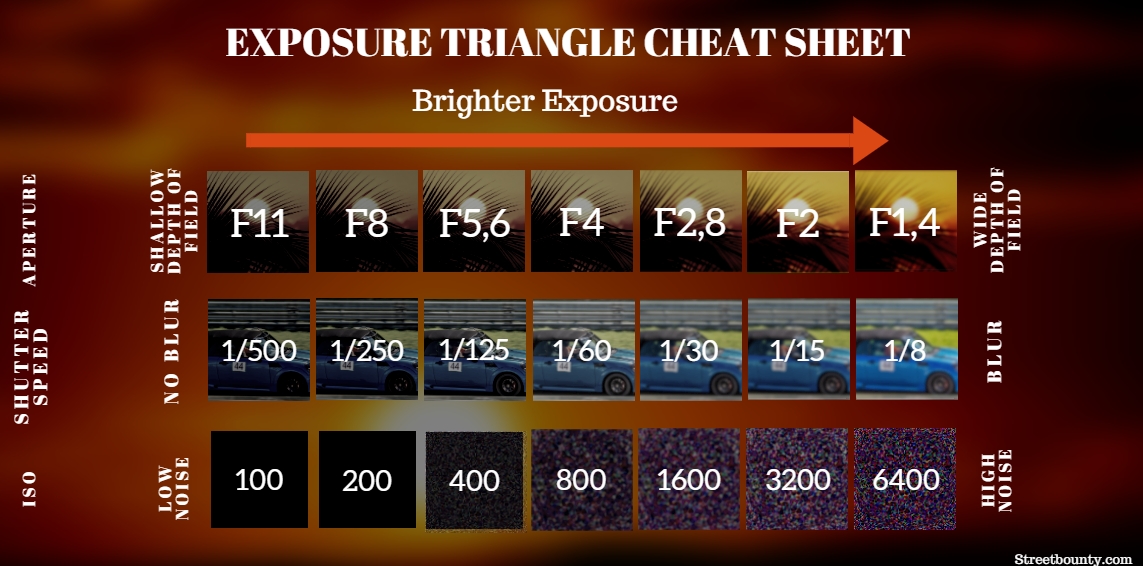
Here You have the three exposure factors in the rows and the full stops in the column.
So if You are adjusting the aperture from f/8 to f/2.8, You are going 3 columns to the right.
To balance things out, You need to go 3 columns to the left of shutter speed or the ISO (Preferrable the Shutter Speed).
Basically, You try to balance every move.
For every step to the left, go the same amount to the right.
This way, You can keep the exposure steady once You found an acceptable level and just want a more shallow depth of field or anything of that sort.
Finding the “Right” Exposure
So far we have always talked about the “right exposure”, but what exactly is the correct exposure for a picture? Is there even an objective measurement for that?
No, at last, the exposure is always something that will be slightly subjective and can vary from Your personal taste or style.
When I am doing a lot of Black & White photos that are a little more gritty, I also like to keep them a little darker. To some, it might be too dark, but for me, it is just the right amount.
You should keep the medium in mind when You think about the exposure though. Depending on Your monitor or device, a picture might look too bright, while on all other screens it is just right in the sweet spot.
If You want to print Your pictures, You also have to adjust the exposure in a lot of cases.
I found adding half a stop in post-processing for prints to be the most accurate for me.
Overexposing vs Underexposing
Then there is also the question what we should do in difficult light situations.
Sometimes we find ourselves in situations, where we just can’t find the right exposure or the light is changing too much.
When You are photographing a wedding in an old church, You will find Yourself in such a predicament. In this case, we have to decide, if we are more happy with slightly overexposed, or underexposed photographs.
Although the exposure is a lot about personal preference when it comes to this decision the answer is clear.
Always underexpose rather than overexpose, when in doubt.
The reason is simple.
Digital sensors have more problems to capture the details in the highlights, than in the dark areas. This means that You can underexpose a photograph often by more than 3 stops and are still able to increase the exposure in post-processing and the photograph will look good. On the other hand, if You overexpose and there are bright areas in Your pictures, for example, the sun in the background, windows with strong natural light or lamps, they will blow out. In this case, there will only be white spots and You will not be able to recover these areas in Lightroom or Photoshop.
The information is simply easier lost in the highlights than in the shadows, therefore it is better to slightly underexpose the picture.
When shooting in automatic mode, You can also use the exposure compensation, to be on the safe side of things. Set Your exposure compensation to -1 and the pictures will be a little darker and won’t have blown out highlights that easily.
Afterward, You can still use Lightroom or Photoshop, to improve the quality of Your photographs again.


