


Do You wonder how Street Photography can be such a fast genre where You have to take the perfect shot in a fraction of a second, but also have to get the focus spot on the target? The secret behind getting sharp pictures in Street Photography doesn’t lie in technical aids or auto-focus systems that have become better. The technique that is used in Street Photography to commonly focus the camera is “zone-focusing”. With zone-focusing, You basically prepare Your camera before You go out to shoot and apply some easy rules while shooting to get everything You want in-focus. Zone-focusing is a great technique that is free of any shutter lag and independent of any automatic mode, yet is one of the most powerful tools in Street Photography.
Zone Focusing in Street Photography History
How did the masters of the past focus their cameras, when there weren’t even any automatic modes. When all they had where simple lenses with manual focus. Did they just miss every fast shot or had to spend a lot of tries and film rolls to finally get a picture sharp?
No, the Street Photographers of the 1950s commonly used zone-focusing as their method to have a high success rate and get in-focus photographs. To avoid having to focus manually for every shot, they rather set the aperture at least to f/8 or f/11 and pre-focused at a certain distance.
The aperture gives them a broader depth of field and with their experience, they know at which distance most of their photographed subjects are. Therefore, they can pre-focus to let’s say 2m and in combination with the more closed aperture, they get a broader focusing area surrounding the 2 meters, which makes it comfortable for them to get the subject in focus.
Advantages of Zone Focusing
At first, zone-focusing might sound a little confusing or complex and You might think that the automatic modes of today’s digital cameras are much better. Let me explain, why zone-focusing is still one of the preferred focusing methods, even though the camera technology has advanced so much.
The most important aspect is that zone-focusing is a lot faster than either manual focusing or using the auto-focus. You could argue that the auto-focus is already so fast that the slight delay doesn’t matter anymore. Truth is, that even the slightest delay in Street Photography can make or break the scene and make You miss the shot. With zone-focusing there is no delay. Just press the shutter and the picture is already there.
You also have full control over the focusing and don’t need to rely on other systems. Being dependent on the camera to make the right decisions and know where I want the focus to be doesn’t feel good. It does limit my creative process and takes away some parts of the fun that is creating the picture myself.
Zone-focusing is also great for light conditions in which the auto-focus mode already faces difficulties. Especially in darker shadows or during the night, zone-focusing is a must. The auto-focus relies on little light and if the light isn’t available it uses a red dot to determine the distance. Even with the support of the red dot, the auto-focus is unreliable most of the time and in Street Photography going around with a camera that emits a red light can be too eye-catching. If You are trying out to use a flash at night, then zone-focusing is the only reliable way to ensure that the flash will also fire, when You are pressing the shutter button and don’t have to wait for the auto-focus.
Explaining Zone Focusing
I already briefly mentioned that for zone-focusing a more closed aperture is crucial and will explain the concept behind this focusing system more detailed now.
Although zone-focusing is such a powerful tool, it is really simple to execute and understand. You set the camera to manual focusing and focus on a certain distance before You go out on the street to photograph. Then You keep the distance to the subjects that You are photographing steadily at around the distance that You focused on before. To make it easier and broaden the depth of field, You set the aperture at around f/8 or f/11 which broadens the depth of field.
Depth of Field
One of the most talked subjects when explaining the myth behind zone-focusing is the depth of field. After reading the explanation and learning that You set the focus once and then photograph at this certain distance, You might feel a little intimidated because it can be difficult to keep shooting at the specified distance.
To help You out, we are increasing the depth of field, which allows for a wider margin of error when guessing the distance to the subject.

There are three factors that influence the depth of field
Aperture
The more closed the aperture, the broader the depth of field will be. To achieve a good balance between a well-exposed picture and a broad depth of field, an aperture of roughly f/8 is good. On sunny days, an aperture of f/11 or even f/16 will give You more leeway when guessing the distance, while on cloudy days an aperture of f/5.6 will force You to guess more accurately.
Focal Length
The longer Your focal length is, the more narrow the depth of field will be, given that the aperture and distance to the subject are constant. In Street Photography, I recommend in general to use a shorter focal length around 35mm. A 50mm is still okay when zone-focusing, but makes Your life unnecessary harder. Therefore I would stick 35mm or 28mm for Street Photography and zone-focusing.
Subject Distance
How far away You set the focusing distance also determines the depth of field. The farther away the focusing distance is set, the more narrow will the depth of field be. A subject distance around 1m to 2m works well to apply the manual zone-focus. Anything farther away will reduce the depth of field too much. As an additional positive effect, the zone-focusing forces You to get closer. If You are too afraid to get close in Street Photography and stay far away from people, then using the pre-focus with a set distance to 2 meters forces You to get close in order to get any usable images.
Pre-Focusing
There are different methods to manually pre-focus depending on the type of camera and lens You have. With my RicohGR, I can set the distance via the menu and the LCD-screen shows me exactly the depth of field as a status bar. I can see how the different apertures affect the depth of field and for a given distance I am able to see where the sharpness begins and ends.
Then there are also lenses where You have different numbers surrounding the lens.
For example, this Leica Summilux lens has the depth of field measurement displayed on the lens.
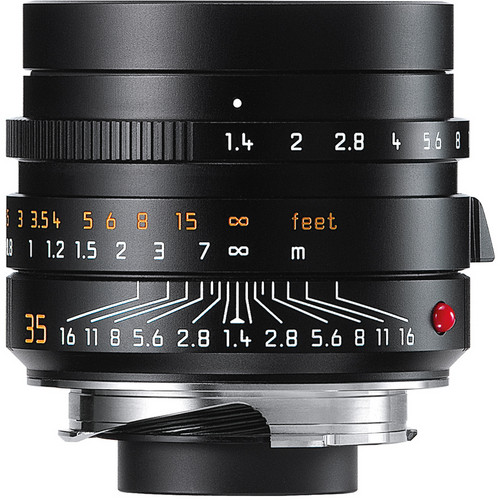
On the top, You can see the current aperture, given in full f-stops.
Below there is the focusing distance, once measured in feet and also in meters.
On the bottom, the depth of field ranges are displayed. At a given aperture of f/1.4, the depth of field is so narrow, that it isn’t really a range, but just a very small stripe. The depth of field increases with a more closed aperture and reaches its maximum for this lens at f/16.
Guessing the Distance
Crucial for this technique is having the right distance to the subject. In street photography, we want to get close to our subjects, so having a focus distance of anything between 1 & 2 meters seems like the best choice.
Guessing the distance to Your subject takes some experience and a lot of practice. Like everything in photography, You will get better and Your intuition for the right distance will become more accurate. If You are unsure about the distance, rather go for a more closed aperture to increase the depth of field.
My Common Settings
Which camera settings You use depends on Your preferences and style of Street Photography. Changing the focusing distance from 1 to 2 makes already a huge difference in terms of depth of field. If You are unsure about which distance You should take, then have a look at Your most recent pictures. Is there a certain distance that is more prevalent than others?
If not, then I would recommend going with 1.5 meters. This distance gives You the choice to be close to Your subjects and feel like in the middle of the scene while showing the surroundings of the person and not only a close portrait.
My common settings for Street Photography using the zone-focusing technique are as followed. The Shutter Speed and ISO don’t have an influence on zone-focusing but I guess it is interesting to see the complete settings.
With my RicohGR II
ISO – 100
Shutter Speed – 200
Aperture f/8
Focusing distance 1.5 meters
Focal length: 28mm
According to the Depth of field Calculator, this gives us a near limit of sharpness of ~1meter and a far distance limit of 2.6 meters.
Changing the aperture to f/11 would give us limits of 0.94 meter to 3.75 meters. As You can see, this gives us almost 3 meters of sharpness in comparison to the 1.6 meters at f/8.
Rather than open up the aperture to increase the exposure, I would try to lower the shutter speed – in case You are not shooting anything fast moving, or increasing the ISO.
Looking at the possible alternative of f/5.6 shows us that the ranges are decreased to 1.15 meters to 2.14 meters, giving us not even one meter of acceptable sharpness.
Sharpness in Street Photography

Zone-focusing can be a very theoretical topic. In this article, we have seen the theory behind the depth of field and how the limits are influenced by the aperture, focal length, and subject distance.
With the help of the calculator, we can even go so far and calculate the “acceptable sharpness limits”. But how sharp is sharp enough?
For Street Photography, I feel that the given ranges of sharpness are way too tight. Yes, a subject that is one meter outside the acceptable range may not be perfectly sharp, but that doesn’t mean that the picture is useless.
In Street Photography, a slightly out of focus character isn’t really harmful and from my point of view, the ranges can be extended beyond the given calculator limits. So if You think that a range of merely 3 meters is very difficult to hit, then keep in mind, that it is only a theoretical value.
The total sharpness range as suggested by the depth of field tool is only helpful as a means to understand the interaction between the aperture, focal length, and subject distance.
When it comes to the actual ranges, I wouldn’t take the values for granted in Street Photography in a way, that I wouldn’t accept any image that finds itself outside the given limits.
Zone-Focusing in a nutshell
In photography, zone-focusing describes nothing else than setting the camera to a certain distance and using the given depth of field to create Your images. Rather than changing the focus, the distance to the subject matters more and should be changed to stay within acceptable sharpness levels.
For Street Photography, it is one of the most powerful tools as it allows us, to concentrate on the composition, rather than the focusing. Through experience, You will find a distance that suits You well.
Although zone-focusing might sound a little limiting since You have to shoot at a given distance, it is a tool that gives me a lot more freedom. Through zone-focusing, I am able to give my full attention to the composition and creating the image, rather than having second thoughts whether the auto-focus was accurate or not.


