


Do You have a new camera and are a little overwhelmed by all the buttons and functions Your camera offers You? Or do You simply want to know which camera settings could be the best for Street Photography? Then I want to give a comprehensive overview of the camera settings that You should have in mind when doing Street Photography.
Camera Settings & Exposure
The most basic characteristic that You can influence is how bright or dark the photograph will turn out. The more light can enter, the brighter the picture will be. That is a very easy to understand characteristic in photography, yet it can take some time to master the exposure.
There isn’t any objective variable that tells You when the exposure is “right”. You have to find for Yourself if a photograph looks too bright or dark. Nonetheless, You should avoid that highlights are “clipping”. Clipping means in Digital Photography that the information in that area is lost. Normally we are able to change the exposure in post-processing very freely now. Lightroom offers You a range of exposure of -5 to +5. But when areas are clipping, You won’t be able to adjust the exposure for that specific field.
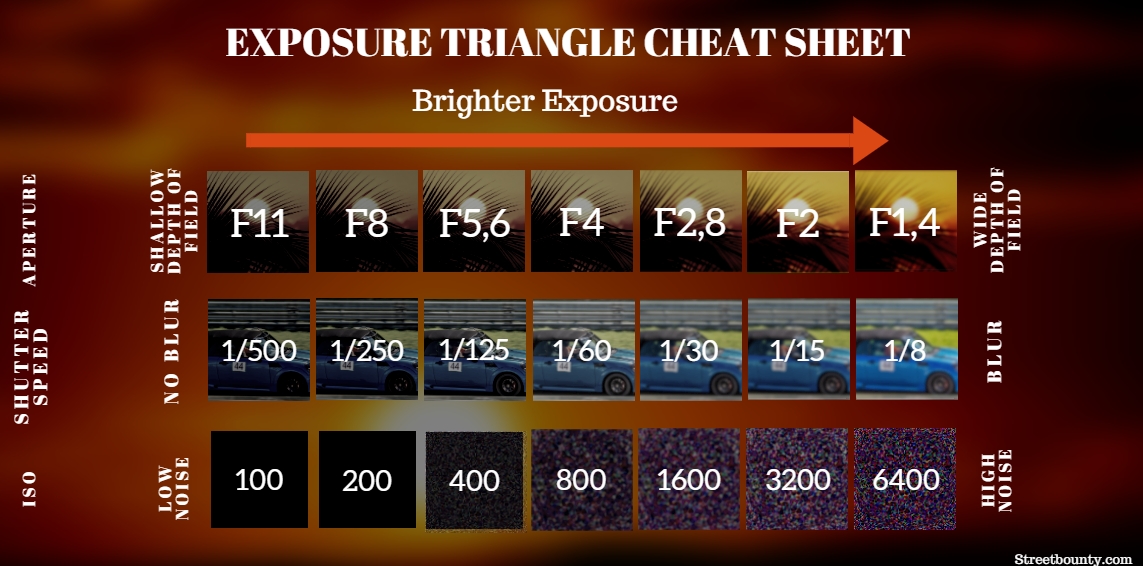
To easier understand how the Exposure works, there is the concept of Exposure Triangle.
Below You can see the overview of the three influence factors that You can change for Your camera Settings.
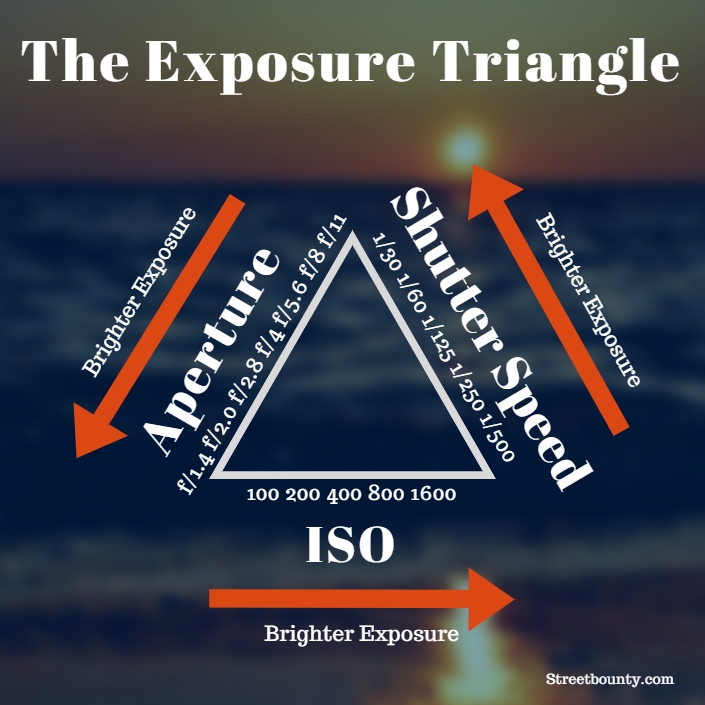
Aperture
The first basic camera setting is the aperture. The aperture describes how open the lens is and how much light the lens will pass through.
The amount of light is described in f-stops and the lower the f-number the more open is the aperture. For example, an aperture of f/1.4 let’s double the amount of light pass through in comparison to f/2.0.
For a more thorough explanation, I recommend You to read my guide about the Exposure Triangle.
We can reduce the specifics of the aperture to two basic findings.
The more open the aperture is, the more light will pass through and the more shallow will the depth of field be.
The depth of field describes the area in a picture that is sharp. Depending on the focal length and aperture, the depth of field can be more narrow or wider. I have the depth of field also explained in my focus techniques article.
Where can You change the Aperture?
This isn’t a silly question since it really depends on the camera where You can change the aperture or what options the manufacturer gives You.
On my RicohGR for example, I have a wheel very close to the shutter button where I can change the aperture.
My FujiX100F lets me adjust the aperture on the lens.
The Canon Rebel changes the aperture via its camera menu.
Check out how Your lens looks like. If it has two rings, then one of them is for changing the aperture and the other one is to focus manually.
Otherwise, look up the manual for additional descriptions on how to adjust the aperture.
Shutter Speed
The Shutter Speed determines how long the sensor or film will be exposed to the light. It is usually measured in fractions of a second and the sensor is only exposed for a very short amount of time.
The longer the shutter stays open, the longer the sensor will be exposed to light and the more bright the picture will be.
While adjusting the shutter speed for Your camera settings, keep in mind that movement also plays an important role.
If You are photographing fast moving objects like motorcars or birds with a long tele-lens, then You want a very fast shutter speed to avoid blurring of the subject.
On the other hand, if You are photographing streams of water and want the water to be soft and a little blurry, then You need a longer shutter speed, sometimes even a few seconds.
The basic rule of thumb is that the shutter speed shouldn’t be slower than the reciprocal of Your focal length. So for example if You shoot with a 50mm lens, then don’t go slower than 1/50s or the photograph will be blurred.
Of course, due to modern stabilization methods, You often can go slower, but You should test first where Your personal limits are, before messing up an important picture.
ISO
The ISO is more a technical and abstract characteristic of modern cameras.
Before the age of digital sensors, the ISO described the chemical sensitivity of the film.
The more sensitive the film was, the less light was needed for a well-exposed photograph, but the quality seemed to suffer.
Today, we have digital sensors but still the concept of ISO.
In general, when I think about the camera settings I would try to keep the ISO at 100. This way You get the best image quality and with every increase in ISO the noise increases as well.
Therefore I would only increase the ISO when my other options (aperture & shutter speed) are already at their limits and can not be changed anymore.
Automatic Camera Setting Modes
Instead of exposing manually, You can also let the camera determine how to expose the pictures.
For everyday use, I would actually recommend using one of the automatic modes, but it doesn’t hurt if You learn to shoot in manual mode as well, just to understand how the exposure triangle works.
Depending on the camera manufacturer there are different automatic settings modes, ranging from fully automatic where the camera controls everything from the Aperture, Shutter Speed & ISO to semi-auto modes where often one or two settings are defined by the user while the rest is being figured out by the camera.
The name of the automatic mode can differ depending on the camera manufacturer, as well as very specific settings, but the basics are similar that I will describe now.
Full Automatic Mode (P-Mode)
Let’s start with the easiest mode – The fully automatic camera settings.
As the name already tells, the camera determines the aperture, shutter speed & ISO to expose the photograph correctly.
Sounds good, doesn’t it? You don’t have to think about the settings and are able to just photograph.
In reality, I found the fully automatic mode to define my camera settings to be very lackluster. Often times, the camera would increase the ISO to make a picture brighter, instead of opening the aperture or slowing down the shutter speed first. This results in a lower quality picture which can be very frustrating, to say the least.
I would not recommend the fully automatic mode, unless You are sure, that the algorithms used by the camera software work in favor of You. This means, that the ISO will be changed when the other options are depleted. Additionally, Your camera software has to allow You to determine the ranges of the camera settings.
As described before, a shutter speed that is too slow lets the subject turn out blurry. Unfortunately, a lot of camera software doesn’t take that into account and the shutter speed can be too slow. Therefore You have to define minimum limits. For example that the shutter speed shouldn’t be slower than 1/100s.
Per definition, this might already not be a fully automatic camera setting for You, since You have already some influence, but without being able to set certain limits, I wouldn’t even think about using the fully automatic setting mode.
Aperture Priority Mode (Av)
Whereas the fully automatic camera settings determine all three settings of aperture, shutter speed and ISO by the camera, the aperture priority is a semi-automatic mode.
You have the control of the aperture and the camera adjusts the shutter speed and ISO dependent on Your aperture.
The aperture priority can be useful when You want to maintain a certain depth of field.
For example, You are shooting portraits and want Your aperture to be wide open, then using the aperture priority can be helpful.
Or You want the depth of field to be more broad, so that You can zone-focus, then using the aperture priority mode can be useful as well.
Whenever You want the aperture to be at a certain value, use the aperture priority mode.
Shutter Priority Mode (Tv)
Of course, You can also set the shutter speed as a priority of Yours.
Do You have fast moving subjects and need the shutter speed to be very fast, then use the shutter speed priority mode to avoid that the subjects are blurred when they don’t should be.
If You are interested in long-exposure and longer shutter speeds, then the shutter priority mode cannot be recommended. For exposures longer than a second, You should definitely use manual mode and figure out the camera settings Yourself.
Auto-ISO
The last tip is not really a camera itself, but a little helper that I use very often myself when photographing on the street.
Whenever I am out on the street and the light is very steady, for example, cloudy and I can foresee that I don’t need to change the camera settings very often, using the manual mode in combination with an automatic ISO is the perfect combination.
Set the camera to the manual mode and the ISO to automatic. Often, modern cameras allow You to define limits for the ISO. Anything between 100 to 1.600 should be okay for normal daytime.
Afterward, You can set the aperture and shutter speed Yourself as is the purpose of the manual mode.
From time to time, check the ISO of the pictures You have taken and if they are constantly in the 800 to 1.600 range, You might open Your aperture or set a slower shutter speed for Your camera settings.
Focus Modes
The exposure is only one part of the basic camera settings that are important for creating good photographs. How often are You frustrated because the pictures turn out unsharp in areas where You wanted the focus to be?
In the following, I want to describe how the different focus modes work. After the explanations, You have to test and try what works best for You. There isn’t any clear favorite, depending on the photographs You want to take, different focus modes can be more suitable.
Full Automatic Focus
Just like the exposure, You can let the camera do all the work when it comes to focusing. The camera has to guess in this case what it should focus on. Of course, this is incredibly unreliable and depends very much on luck, that the camera guesses right.
I would not recommend that focus mode, as it can be very frustrating to work with and You will lose all the fun in photography.
Spot Focus
Instead of letting the camera decide where You want to focus on, You can also take one of the focus points and move it to the desired subject. The camera will then make sure, that the subject that is on the point will be sharp.
To focus on the spot, You should press the shutter button half-way through, wait until the lens has focused and then You can press the shutter button all the way down.
Depending on the camera, You can either choose from pre-defined focus points or move one focus point around the field of view.
Modern cameras can have more than 150 focus points to chose from, so You don’t have to move the camera too much, but can use the pre-defined focus points instead.
Area Focus Modes
Starting from one point, You can also add more focus points to the area that should be sharp. This way, You don’t have to be very precise to hit the focus area with the focus spot. You have a group of focus points that need to be on the subject.
This mode combines all the advantages and disadvantages of the full auto-focus mode and the single focus mode.
You have a wider area to focus on, but at the same time, the camera has to decide where exactly it has to focus. While it is by far better than the fully automated mode, it still can be frustrating to deal with, when the camera chooses the wrong spot to focus on.
Continous vs. Single Focus
Besides the choice of focus points, You also have the option to set the auto-focus to either continuously focusing or single focus.
In the single focus mode, You press the shutter button half-way through, the lens focuses and then while the shutter button is still half-way pressed You are able to move the camera while the focus distance doesn’t change.
If You set the camera to continuous focus, the camera will continue to focus on the subject even when the button is half-way pressed. This can be beneficial for moving objects that change their distance to the camera very quickly and are in the danger to leave the focus plane very quickly.
Other than that, I prefer the single focus mode, because it does allow You to frame the picture while making sure, that the focus stays where I wanted it to be.
Camera Settings for Street Photography
Sunny Weather: f/8 | 1/400s | ISO 100
Cloudy Weather: f/5.6 | 1/200s | ISO 200
Street Photography is a very quick discipline. In contrast to other genres, You don’t have multiple tries to find the right settings. The photograph You are taking has to be successful immediately, as moments are fleeting very quickly. Having the right settings for Street Photography helps You to concentrate on the photography part. Rather than adjusting the settings for every photograph, You should find some generic settings that You are familiar to work with. With the right settings in Street Photography, You are able to focus on the composition and the content of the photograph to tell a story.
Beneficial are the semi-automatic modes that I have described before in this article. For Street Photography under normal light conditions, I recommend either the auto-ISO mode, where You are able to set the aperture and shutter speed Yourself and the camera determines the ISO or You can use the semi-automatic mode where You can set the aperture and the ISO to the lowest and only the shutter speed will be determined by the camera.
Like all settings, You have to try which are working the best for You and figure out which are able to translate Your style into the photographs the best.
For me, I usually use the manual mode in combination with the auto-mode. On a normal rather sunny day in Berlin, I use the following camera settings for Street Photography: f/8, 1/200s, ISO 100. These are good basic settings You can start with and have a look how the pictures turn out.
I would always go with an aperture where the field of depth is not too shallow. In Street Photography, where we have to shoot very quickly, I would recommend learning how zone focusing works and adjust the settings accordingly. Therefore something around f/8 and a focusing distance of around 1.5 meters work very well for my usual photography style.
Depending on the weather conditions You can change the settings. If Your pictures turn out too dark, then going with an aperture of f/5.6 is also ok, or slowing the shutter speed down to 1/100s. As the third option, I would raise the ISO and just accept the slightly decreasing quality.
In general, I also have the exposure to -1 or -2, to avoid any clipping in the highlights and I prefer some slightly darker pictures anyway.
Camera Settings for the Night
For Light Trails f/5.6 1/4s ISO 100
Street Photography at night can be a challenge, but it is a challenge that is very well worth it. You can either try to find the right settings for Street Photography at night Yourself or take the following advice.
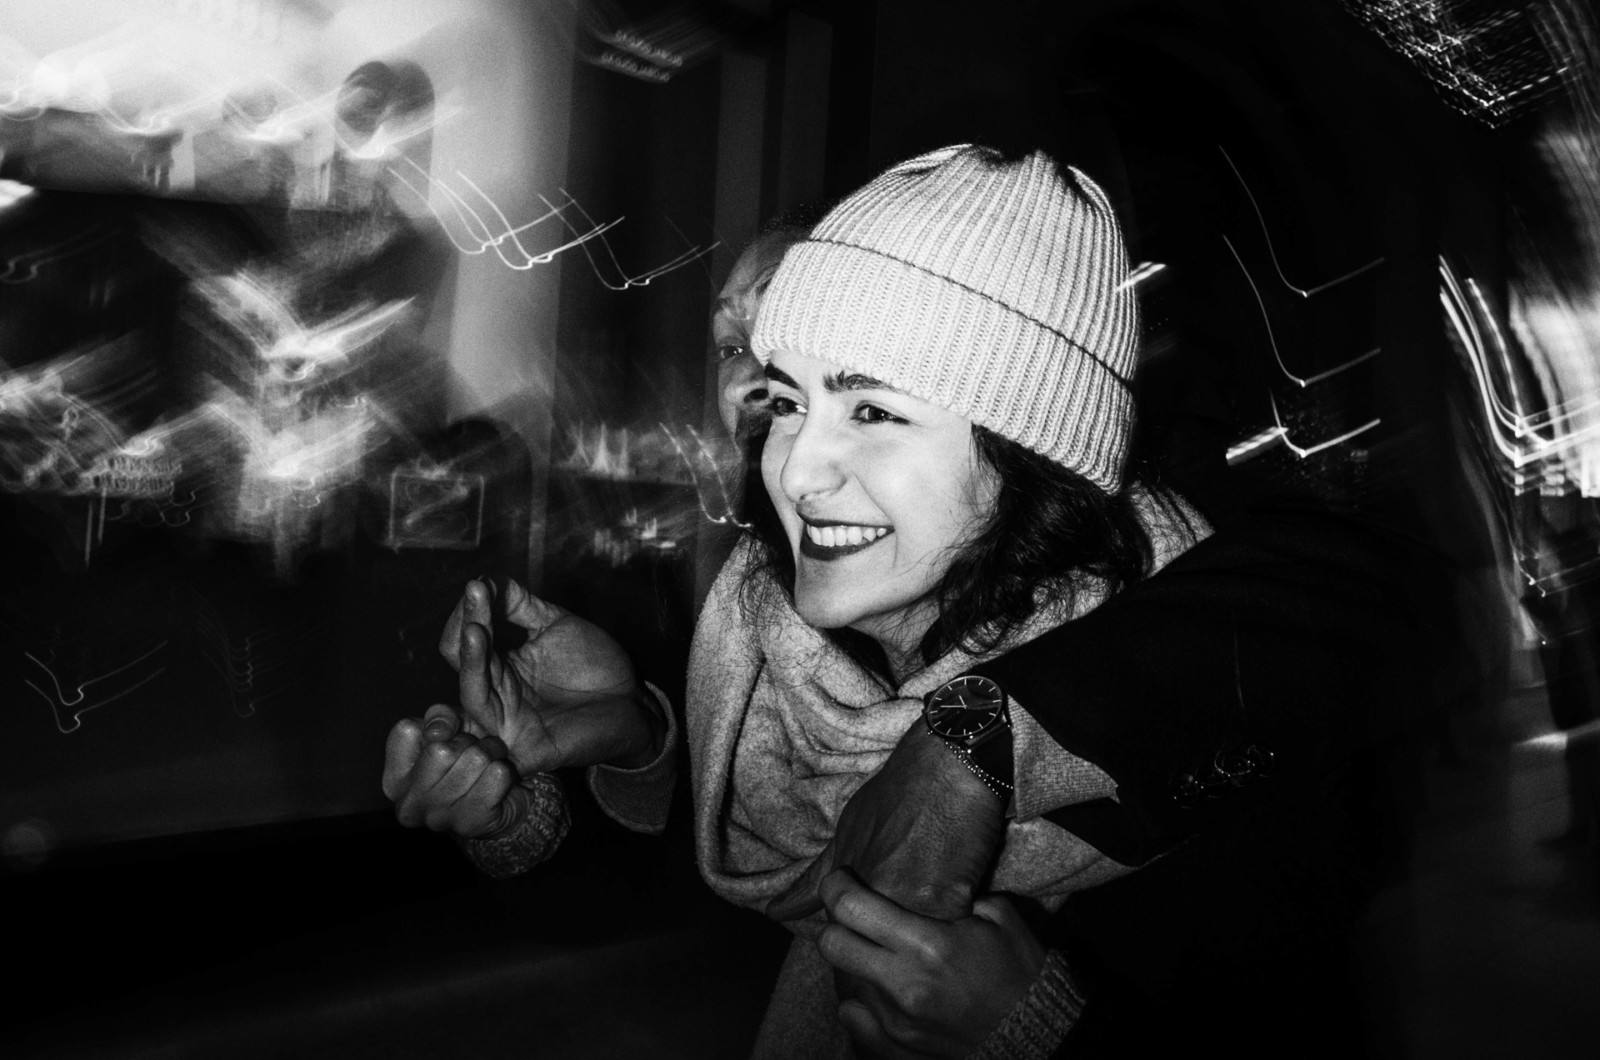
At night, I am mostly working with a flash and the following settings are for creating light trails at night with a flash. A basic requirement for this style is that there are lights in the background. Without the lights in the background, You only have the foreground which is lighted by the flash anyway.
To create the light trails, You have to use a slower shutter speed. In this technique, the shutter speed only influences the look of the background that isn’t directly lighted by the flash. The slower the shutter speed, the more increased will be the effect of the light trails.
Personally, I like to use a shutter speed from 1/4s to 1/10s to create the light trails I like to have in my pictures.
The aperture is still around f/5.6 and the ISO at 100. If the foreground turns out too dark, I have to either increase the strength of my flash or go closer to the subject.
Getting close is important for the flash to light the subject in the foreground. Doubling the distance to the subject means that the flash needs 4x times the power to have the same effect. On the flipside, if You go closer, the power needed is also reduced heavily.
I use a very basic and simple flash and at full strength, the flash needs a long time to recharge fully. With my setup, I can only shoot once and then have to wait until the flash is ready again. This means that You need a lot of tries and shouldn’t be discouraged quickly.
Final remarks for finding the right Camera Settings
The presented camera settings are very fundamental and describe how I use my camera most of the time while doing Street Photography. They don’t might work for You, Your camera or Your style in general, but they can offer some basic guideline that You are able to customize according to Your style.
In general, I would recommend shooting manually for some time, to understand the exposure triangle fully. You can also my Exposure cheat sheet, that helps You to balance the exposure for every shot.
This can help You to find the right camera settings in more extreme situations, where the automatic modes don’t offer much help.
Try what works best for You and from there You can modify Your camera settings to Your needs. Once You have found a good setup, don’t try to change it too often and rather focus on photography.


