


The rule of thirds is probably one of the best-known rules in photography or arts in general. For a very good reason – it makes a simple boring picture more interesting just by positioning the subjects differently.
The composition isn’t a magical thing that you can’t learn or have to be born with to understand it. The following article will teach you how to make every photograph more interesting by embracing the rule of thirds and also tell you the reasons why the images that follow this simple rule are more interesting to us.
The Basis of the Rule of Thirds
The rule of thirds is a simple rule that tells you how to arrange certain proportions of the image or where to place subjects in your photographs. It is based on the golden ratio which can be described as followed:
Two quantities are in the golden ratio if their ratio is the same as the ratio of their sum to the larger of the two quantities.
This means that in simple if you are a landscape photographer and photograph the horizon, that the ground should be taking roughly 2/3 of the image while the sky should fill the remaining 1/3.
Placing the horizon directly in the middle usually makes more boring pictures and seem more uninteresting displaying the exact same scene. Just with a small change following the compositional rule of thirds you can improve the aesthetics of an image.
The golden ratio can be found throughout nature in spiral arrangements for example in snail shells.

As you can see, nature has a special place for the golden ratio and it makes sense to utilize this ratio in your Photography to make pictures more interesting.
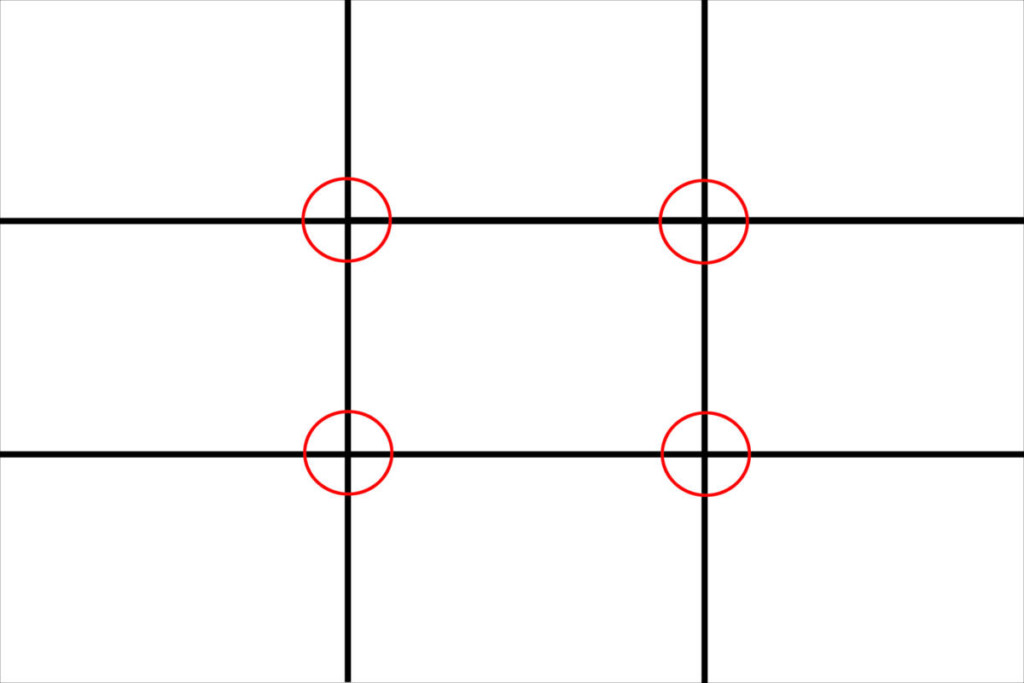
In the next step, the mathematical golden ratio has been simplified to the rule of thirds, where you have a simple overlay to compose your photographs.
The psychology behind the rule of thirds and why it is so pleasant for us is little known. But it seems that every “easy ratio” is more aesthetically pleasing for us. For example in music the harmony of an octave which also represents a frequency of 2:1 is seen as one of the most comfortable hearing experiences.
Why Photography Rules are important
There are a lot of deniers that argue that photography has no rules to follow and that everything should be done simply by instinct.
In my opinion, this is a very ignorant view on photography. There are universities teaching arts for years – also including “simple” things like the rule of thirds.
There is absolutely no shame in “admitting” that you photograph having those rules in your back of your mind. Rules are important to give you a basic guideline to create interesting images. What you do and how you interpret those rules is up to you.
The rules of thirds is a very basic compositional pillar and later I will show examples how different Street Photographers interpret this rule differently.
Following the rules also doesn’t limit your creative freedom. In my opinion, it even extends your options because you are already presented with different directions that you can follow and don’t have to build up everything from scratch.
Breaking the Rules
How strict you follow the rules is of course up to you. Not every photograph has to follow this exact rule. As with every rule, there are exemptions where other arrangements might be more favorable or create an atmosphere that you are seeking.
However, it is important to understand how the rules of thirds work in your picture and how breaking away from this rule changes the aesthetics of the image.
In addition to the rule of thirds, there are a lot more rules that we as photographers should try to master before breaking them on purpose – those include
- The Rules of Odds
- Layering
- The Background
- Leading Lines
- Storytelling
Straying away from all these rules means to create just a chaotic mess.
To say it simply: It won’t work for you.
Arts is not some free-flowing element that doesn’t follow the rules of nature. Photography is to a greater extent a craft. Learning and applying those rules is part of being a good Street Photographer.
The Learning Process
At first, all these rules and even the rules of thirds might confuse you more than making your photographs better. You feel overwhelmed before clicking the shutter button because suddenly there are so many aspects you have to take into account before taking the image.
In a fast-paced genre like Street Photography, you might not find this time to think twice. Usually, we have to click immediately without having the time to mark every rule of the check-list.
If you just learned about those rules, don’t try to learn them at the same time.
Rather pick a specific rule like the rule of thirds, go out and shoot. Before taking the picture only think about the arrangement and if it would fit the rule of thirds, take the image. Ignore every other aspect.
After some short time, you shouldn’t have to make the conscious decision to embrace the rules of thirds. It will come naturally to you. If you are at that point, pick another rule and practice it the same way.
This is what photographers describe as having “a good eye”. Only that it comes through a lot of practicing hours instead of being a God-given gift. But this is a secret, that most photographers don’t want to admit.
The Rule of Thirds in Street Photography
The easiest way to apply the Rule of Thirds is by focusing on one or maybe two subjects and place them on the shown lines that are given in the overlay. Therefore it is also a lot easier if you have a very “reduced” image that in general only shows one subject, than showing a group of people.
When having multiple subjects, it can get more difficult to arrange them in a way that the most interesting subjects are following the rule of thirds, while the rest of the group doesn’t destroy the composition.
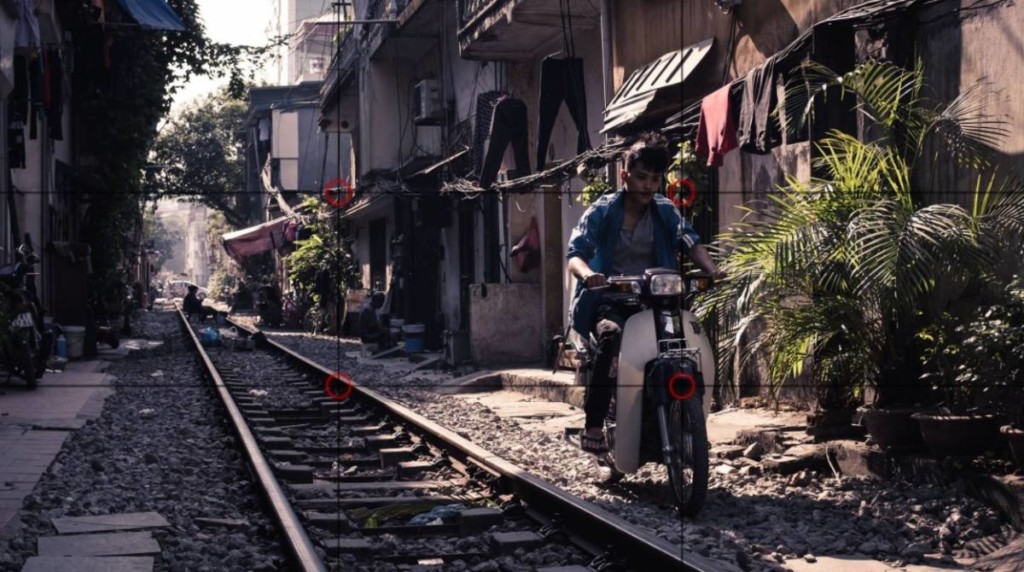
In this picture, you can see the scooter rider in the foreground being placed around the right third, while the second subject is roughly placed on the left third.
In reality, when placing your subjects, you will have a hard time to do it 100% accurately, because Street Photography is candid and you are not able to direct the subjects. Therefore trying your best when composing the image is the most you can do and see if the image still works.

In this example, you even have the lines in the background guide you through the rules of thirds.
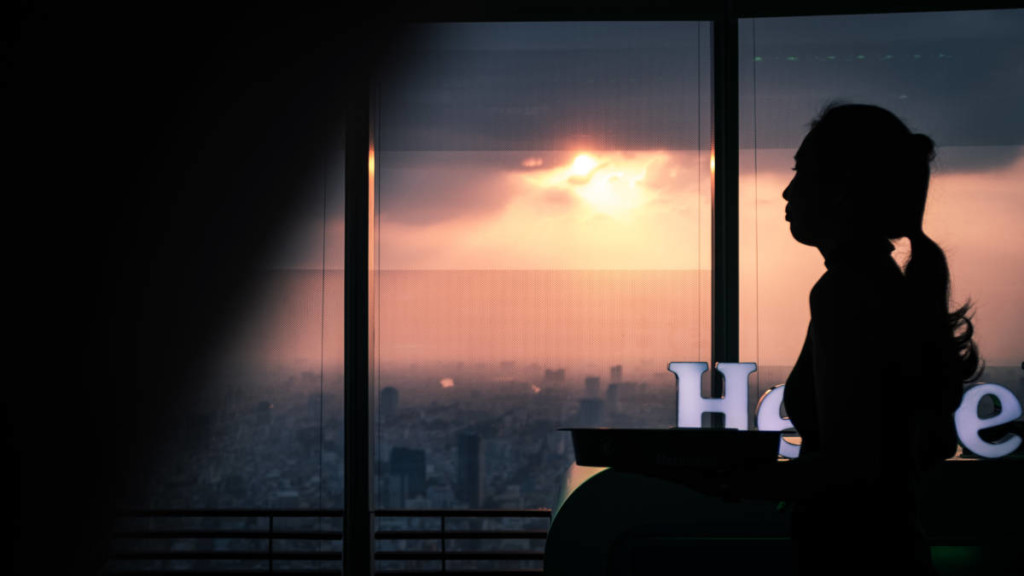
Make sure to place your most important subject according to the grid. In this case, I wanted the focus to be on the woman. Her expression is a lot stronger, she is closer to the camera and seems more interesting all around. That the guy in the background is not perfectly placed on the right third then doesn’t hurt the photograph much, because the focus is not him.
Seeing the Rule of Thirds Grid
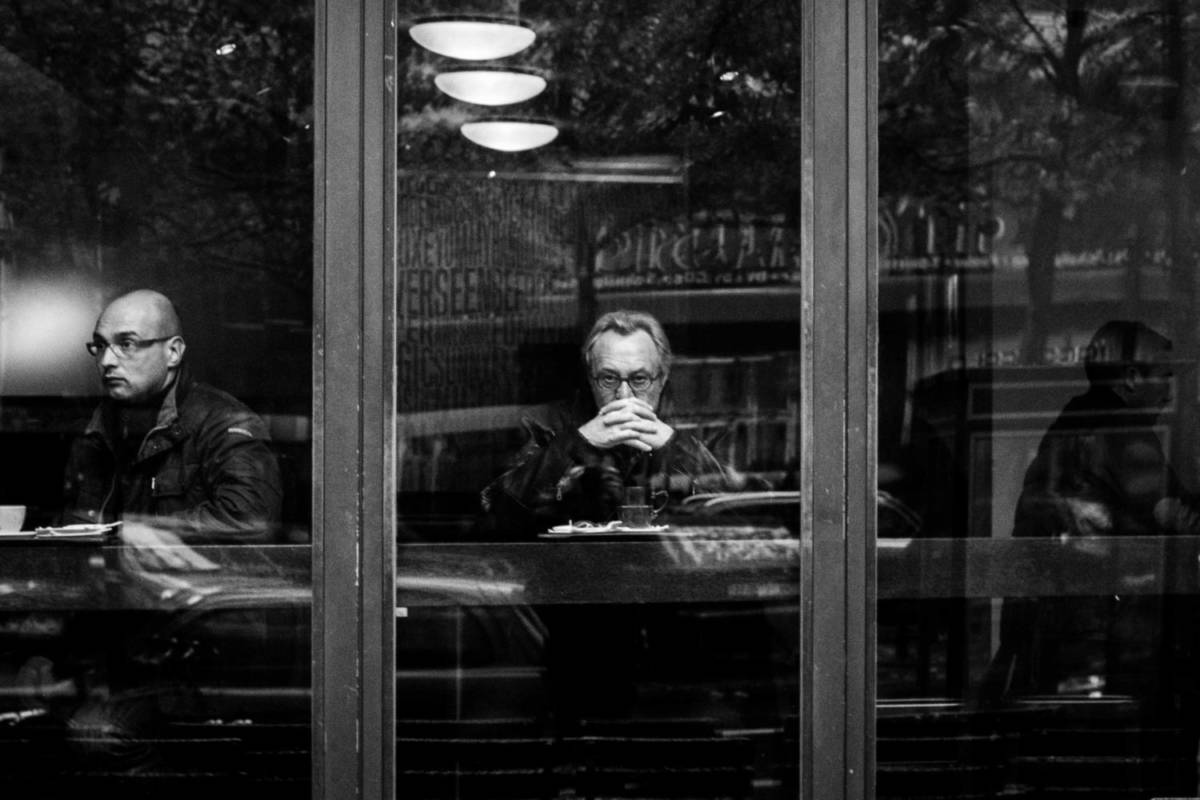
In the photographs before, subjects were placed along the grid of the rule of thirds. Another way of applying the rule of thirds is by looking for these kinds of grids naturally in your environment.
In this case, the windows form a natural grid that divides the photograph into three sections evenly. To avoid any overlapping of the subject with the background it is better to place the person either on the far right or left, depending on the direction they are heading.
Another similar approach can be seen here. Again the image is divided into thirds, only this time there are people behind every third, with the most interesting person placed in the middle of the action.
When you are out on the street photographing, make it your challenge to see those grids and maybe you can also find a person that walks by or fits the scene. This is a great training in seeing the rule of thirds.
Variation of the Rule of Thirds in Photography
I was already talking about breaking the rules and the most prominent photograph of the last century, already proves that it can be sometimes beneficial to do things differently.
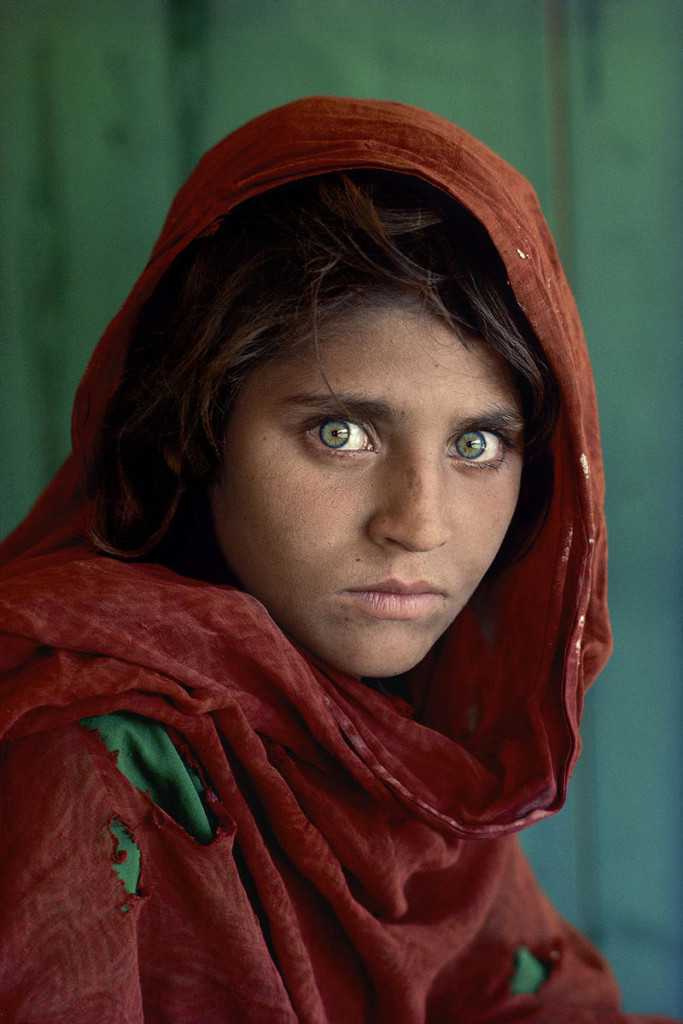
In the “Afghan Girl” by Steve McCurry you can see that the subject is merely placed in the middle, which we should normally stay away from. But if we look further, the subject may be placed somewhere in the middle of the image, but the true focus is on the eyes.
Of course, you notice the eyes popping out of the image, partly due to effective post-processing. When looking at the composition there is also one neat little trick. The dominant eye, which in this case is the one closer to the camera, is placed directly in the center of the image, thus giving her look even more power.
If you are doing a lot of these travel portraits, try doing the same. Have your subject look over one shoulder, so that one eye is closer to the camera. Then try to place this eye directly in the center of the photograph.
Conclusion
The rule of thirds is not just some little tip, it is the basis of your composition and can improve the aesthetics of your photographs tremendously. Learning those rules is part of becoming a better Street Photographer. Although you might feel, that those rules are not very enjoyable to learn and feels more like work, it will definitely help you in your growth.
In Street Photography, the rule of thirds cannot always be applied perfectly. This lies in the nature of candid photography. But trying to embrace it, either on the spot or by cropping the picture in post-processing should be always in your mind.
The good thing though with experience and over time, you will not have to consciously remember this rule. It will be a natural part of your visual aesthetics and you will “automatically” see the rule of thirds in your photographs.
If you want to see the rule of thirds in photographs, I also recommend the free browser extension “Rule of Thirds” that displays an overlay over photographs.
Hopefully, this will show you that photography is also to a greater part a craft that you have to learn if you want to take photographs. Often, people are hesitant to admit that Street Photography can be party work and is not always fun.
The Rule of Thirds is your fundament in learning the composition of Photography and creating more beautiful pictures.


